February 2010 Archives

Mahi Mahi en Papillote (Asian Style Paper Wrapped Fish)

  |     |   Print

mahimahi.jpg
Mahi Mahi en Papillote

Recipe and photos reprinted with permission by Chef David Wells "Grandma Dave"


chameleon_logo.png

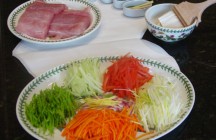
Yield: Six Portions

Prep time: 60 minutes

Cooking time: 15-20 minutes


Equipment Needed:

Parchment Paper

Sheet pan(Baking Pan)


Ingredients: 

  • 6 Pieces Parchment cut into hearts see illustration
  • 2 T melted butter
  • 6, 6-8 ounce portions Mahi Mahi fillet
  • 2 large Carrots, julienned
  • 2 Stalks celery, julienned
  • 9 Snow peas julienned     
  • 9 shittake mushrooms stemmed and slice thin(optional)
  • 1 leek julienned
  • 1 ½  “ chunk ginger, julienned
  • 1 ½ “ chunk lemongrass, cut into thin strips
  • 1 bunch scallions, thinly sliced on a bias
  • 2 lemons juiced
  • 1T sesame seeds
  • Kosher or sea salt and fresh ground black pepper to taste

fish1.jpg


Method:

Preheat oven to 375.
Cut Parchment into giant hearts
Lay out parchment and brush melted butter onto hearts evenly.
Try doing three at a time as they will take up a lot surface area.
Place fish down onto center of one side of parchment heart.

fish2.jpg


Lay down ginger, lemongrass, sesame seeds and scallions on either side of fish fillet.
Evenly distribute vegetables over fish fillet.

fish3.jpg


Drizzle lemon juice over vegetables.
Season with salt and pepper.
Fold over other side of parchment and continue to fold over small creased sections as illustrated.

fish4.jpgfish5.jpg

Bake for 15-20 minutes until paper is golden and fish is making a tzzsssss sound.


Mediterranean Chicken

  |     |   Print

medolives_sm.jpg
Mediterranean Chicken

Recipe and photo reprinted with permission by Chef Dawn Viola


dmglv.jpg

Dawn Viola of "Wicked Good Dinner" is an award-winning chef and food-writer.  She recently won the 2009 Crisco National Apple Pie Championship (professional division) for her wonderful Vanilla Vanilla-Bean Roasted Apple Pie.  Dawn has also appeared on Food Network, Fox News, Martha Stewart Radio, Cooking with Emeril and has been featured in Desserts Magazine.

She has graciously agreed to be a contributor to my website and I'm thrilled!  Her recipes are original and always use high quality and fresh seasonal ingredients.  Thank you Dawn!

Servings:
 6 single portions
Method: Roasting
Allergy Info: Soy-free, gluten-free, wheat-free, dairy-free
Prep time: 15 minutes
Cook time: Approximately 45 minutes

Ingredients:
  • 6 Chicken legs with thighs
  • 20 Kalamata olives, pitted, chopped - you can use all of one kind, or a mixture
  • 2 Lemons, zested, then sliced, skin and pith removed
  • 2 Roasted red peppers, chopped
  • 12 cloves Garlic, crushed
  • 1/4 cup Olive oil
  • 1 tablespoon Fresh rosemary leaves (about 2 branches) 
  • 1/2 cup Apricot preserves
  • 1/4 teaspoon Sea salt (plus more to taste)
  • Pinch of red pepper flakes (or to taste)

Directions:
Preheat oven to 400 degrees F.

Place chicken in a large roasting pan, without overlapping. Loosen the chicken skin with your fingers, without completely separating the skin from the chicken, creating an air pocket between the meat and skin.

Create the stuffing:
In a separate bowl, mix the olives, lemon zest, lemon slices, roasted peppers, garlic, olive oil, rosemary, and apricot preserves. Add 1/4 teaspoon of salt and stir. Taste for seasoning and add more salt if needed. Add red pepper flakes to taste.

Divide the stuffing mixture into 6 parts and stuff under the chicken skin, covering as much surface area of the meat as possible. Rub any remaining mixture over the top of the chicken. 

Sprinkle the top of each chicken leg with sea salt.

Roast in the oven for 45 minutes, or until a meat thermometer reads 160 degrees when inserted into the thickest part of the chicken thigh. Allow to rest for 10 minutes -- the chicken will come up to 165 degrees.

Chef's Notes:
Serve with couscous and honey glazed carrots with local orange blossom honey.

This recipe is also great with chicken wings and drummettes. Chop ingredients slightly smaller, about 1/4" pieces, and smother the wings and drummettes in the stuffing instead of placing it under the skin, then bake for 25 minutes.

Avocado and Mango Salad with Tequila-lime Vinaigrette

  |     |   Print

avocado-and-mango-salad-lr.jpg

Avocado and Mango Salad with Tequila-Lime Vinaigrette


Recipe and photo reprinted with permission by Viviane Banquet Farre

www.foodandstyle.wordpress.com


serves 4

For the vinaigrette

  • 1/2 teaspoon finely grated lime zest (use a microplane grater)
  • 1/2 teaspoon finely grated orange zest (use a microplane grater)
  • 2 teaspoons lime juice
  • 1 tablespoon Gold or Reposado Tequila
  • 1 tablespoon sherry vinegar
  • 3 1/2 tablespoons extra virgin olive oil
  • 1/4 to 1/2 teaspoon Tabasco to taste
  • 1/8 teaspoon sea salt

For the tortilla strips

  • 1 large flour tortilla – cut in 1/8” x 2” strips
  • 2 tablespoons olive oil
  • large pinch sea salt

For the salad

  • 2 bunches arugula – root ends trimmed, rinsed and spun dry
  • 1 large ripe mango – peeled, cheeks cut in 1/8” slices
  • 1 firm, ripe avocado – peeled and cut in 1/8” slices

Step 1: To make the vinaigrette – place the zests, juice, Tequila, vinegar, oil, Tabasco and salt in a small bowl and whisk until well blended. Set aside.


Step 2: To make the tortilla strips – heat a large heavy-bottomed skillet over medium-high heat. Add the oil and the tortilla strips. Sauté for 2 to 3 minutes until golden on all sides and crispy, tossing from time to time. Remove from heat, transfer to a plate, sprinkle with salt and cool to room temperature.


Cook’s note: Once cooled, the tortilla strips can be stored in an airtight container for up to 3 days.


Step 3: To serve, place a few leaves of arugula in the center of each plate. Drizzle with half the vinaigrette. Top with slices of avocado and mangoes, alternating them and slightly overlapping the slices. Drizzle with the balance of the vinaigrette. Garnish with the tortilla strips and serve immediately.

Artichoke & Prosciutto Strata

  |     |   Print


Mendocinobay.jpg

Artichoke & Prosciutto Strata

Recipe from Morning Food by Margaret Fox & John B. Bear


In my home town of Mendocino, there is a well-known restaurant called Cafe Beaujolais.  For years, the owner and chef, Margaret Fox turned out some of the most wonderful dishes on the coast.  During that time she and John Bear authored two special cookbooks based upon the menu at Cafe Beaujolais.  Both books are terrific, but I really enjoy Morning Food because it brings back memories of her legendary breakfasts at the Cafe.  

Although Margaret has sinced moved on from Cafe Beaujolais... the restaurant is still in operation and continues to receive rave reviews.

Visit Margaret's Website for a Personalized Copy of Morning Food


makes 1 8-inch square pan

Ingredients

  • 1/2 ounce dried porcini mushrooms
  • 1/2 cup porcini soaking liquid
  • 4 large eggs
  • 3 cups half-and-half
  • 1/4 tsp freshly ground pepper
  • 8 cups (or 10 ounces) ocubed crusty bread - approx 1 1/2 to 2 inch cubes
  • 1/2 cup fresh basil, cut into thin strips (then measured)
  • 1/2 cup fresh dill, chopped
  • 1 (6.5 ounce) jar marinated artichoke hearts, drained (or I use fresh baby artichokes)
  • 3 ounces prosciutto, chopped into 1/2 inch strips
  • 1/2 cup grated Fontina Val d'Aosta cheese
  • 4 ounces fresh goat cheese, crumbled
  • 1/2 cup grated Parmigiano-Reggiano cheese


Step 1:  Soak the porcini in hot water to cover for about 30 minutes.  Drain, reserving the liquid, and chop the mushrooms fine.  Strain the liquid through a coffee filter or several layers of cheesecloth to remove any grit.  Reserve 1/2 cup.


Step 2: Beat together the eggs, half-and-half, porcini liquid, salt and pepper until well blended.  Adjust for seasoning.  Place bread cubes in a large bowl and pour the egg mixture over it.  Stir and let sit for 30 minutes.... stir occasionally.


Step 3: r Place half the bread cubes on the bottom of a lightly buttered 8-inch square pan.  Layer over this all the basil and dill, all of the artichoke hearts, half the prosciutto, half the porcini, half the fontina, and half the goat cheese.  Cover with the other half of the bread cubes, and layer on the remaining ingredients in the same sequence.  Sprinkle with the grated Parmigiano-Reggiano cheese and pour any remaining custard over the top.


Step 4: Bake at 350 degrees for 1 hour, uncovered.  If the top starts to brown too much - cover with foil.  Let rest about 10 minutes before serving.

Mac & Cheese with Braised Leeks, Asiago and Parmesan Breadcrumbs

  |     |   Print

mc-lr.jpeg

Mac & Cheese with Braised Leeks, Asiago and Parmesan Breadcrumbs

Recipe and photo reprinted with permission by Viviane Banquet Farre

www.foodandstyle.wordpress.com

serves 8

For the leeks

  • 3 tablespoons olive oil
  • 4 leeks – 4” of tops and roots trimmed (about 1 1/2 lbs), cut in half lengthwise, thoroughly washed and cut in 1/4” slices
  • 4 large garlic cloves – skinned and finely chopped
  • 1/4 teaspoon red pepper flakes
  • 1/2 teaspoon sea salt
  • freshly ground black pepper to taste
  • 3/4 cup white wine

For the béchamel

  • 6 tablespoons unsalted butter
  • 6 tablespoons unbleached white flour
  • 6 cups milk – warmed
  • 1 cup heavy cream
  • freshly ground nutmeg to taste (use microplane grater)
  • 1/2 teaspoon sea salt
  • freshly ground black pepper to taste
  • 8 oz Wisconsin Asiago – coarsely grated (2 cups)

For the bread crumbs

  • 1/3 cup bread crumbs
  • 1/2 cup finely grated Wisconsin Parmesan
  • 1 tablespoon olive oil

For the pasta

  • 1 lb pennette lisce or macaroni
  • 1 tablespoon sea salt (for the pasta water)
  • 1 medium ceramic or glass baking dish – buttered

Step 1: To braise the leeks – Heat a large non-stick skillet over medium-high heat. Add the olive oil and leeks. Toss well and sauté for 5 to 6 minutes until leeks have wilted and just begin to take on a golden color, tossing from time to time. Add the garlic, chili pepper flakes, salt, black pepper and wine. Quickly toss, reduce heat to medium-low and cover pan. Braise leeks for 25 minutes until very tender and all the juices have evaporated (if there is still some liquid in the pan after braising the leeks for 25 minutes, sauté at high heat for 1 to 2 minutes until all juices have evaporated). Transfer to a bowl and set aside.


Step 2: To make the béchamel – Place the butter in a heavy-bottomed saucepan over medium-high heat. As soon as the butter is melted, whisk in the flour and cook, whisking constantly for 1 to 2 minutes until the mixture becomes foamy and the flour becomes golden, but not brown. Quickly whisk in the warm milk and cream. While constantly whisking, bring back to a boil. As soon as it reaches boiling point, lower the heat to medium and simmer for 6 to 8 minutes until the béchamel has slightly thickened, still whisking constantly. Add the nutmeg, salt, pepper and grated cheese. Whisk until the cheese has melted and remove from heat.


Step 3: Place the breadcrumbs and parmesan in a small bowl. Drizzle with the olive oil and mix well. Set aside.
Pre-heat oven to 375°F.


Step 4: Bring 6 quarts of water to a boil. When the water is boiling, add the salt and the pasta. Cook the pasta about 2 minutes less than the package instructions so that it’s not cooked all the way through (see picture below). Drain well and transfer to a large bowl. Add the leeks and béchamel to the pasta and stir until well blended. Transfer to the prepared baking dish. Sprinkle with the breadcrumbs and bake for 15 to 20 minutes until bubbly on the sides and golden. Remove from oven and heat the broiler on high. Place the mac & cheese under the broiler for a few seconds to brown the breadcrumbs. Remove from oven and let cool for 5 to 10 minutes before serving.


Cook’s note: The mac & cheese is best eaten as soon as it’s made. Reheating will make it stodgy. The braised leeks can be prepared up to 1 day ahead and refrigerated. The béchamel can be prepared up to 3 days ahead and refrigerated. Gently reheat it over medium-low heat and thin with a little milk before using in the recipe. Boil the pasta, assemble and bake the mac & cheese just before serving.


For step by step photos and directions, please visit Viviane's website 


Campbell's "Simple Sunday Suppers" Charity Contest

  |     |   Print
Campbell's Simple Sunday Suppers Charity Contest

If you have been reading my blog, you know that I enjoy contests for charity.  It's a fun way to get involved with great causes while working with my favorite food bloggers around the country. 

Recently CampbellsKitchen.com and Goodbite.com teamed up to create another charity contest opportunity. They asked five of the nation's top food bloggers to come up with a recipe using one of Campbell's Condensed "Great for Cooking" Soups.  Good Bite put together a video series showcasing the preparation of the recipes.  Viewers may vote for their favorite recipe (or food blogger.)  The winning blogger will donate $1,000 to their favorite charity.

My recipe - California Coq Au Vin, I decided to use Campbell's Chicken Broth and my California Coq Au Vin... truly one of my favorite Simple Sunday Suppers.  You can watch my video below... To vote for my recipe please visit http://www.goodbite.com/campbells and vote while watching so you can help my charity win $1,000! My charity - Food For The Poor:  We've all seen the horrors of the aftermath of the earthquake in Haiti. FFTP has been helping the children of this already impoverished country for many years. They provide whatever is needed on an emergency level, but they also focus on providing good housing and education that gives these families the tools to strive for a much better way of life.  Forbes Magazine reported that Food for the Poor has the most impressive financial commitment ratio compared to all other large charities . . . 97% of what is donated is actually used towards the charitable expenses instead of administrative costs and salaries.  So please vote for my recipe so that I can donate $1,000 to the children of Haiti.

Stuffed Bacon Wrapped Grilled Jalapenos

  |     |   Print
stuffedjaleas.jpg
Stuffed Bacon Wrapped Grilled Jalapenos

Ingredients:  
  • 12 large Jalapenos
  • 2-3 oz of cream cheese, softened
  • 1/4 cup Machego or jack cheese, shredded
  • 1/2 cup very sharp cheddar cheese, shredded
  • 16 slices of bacon

*you could also use goat cheese or feta as a variation*


Step 1:  After washing peppers, cut off the tops and carefully clean out the seeds and ribs.  
Rinse with water again and dry. Normally when working with chiles I would never 
recommending rinsing or washing in water as they lose their oils - but in this case, you 
don't want these to be too hot.

Step 2:  Cut bacon strips in half. Over low heat render the bacon lightly until just soft and 
some of the fat has rendered. Set aside all bacon except four slices. Raise heat and cook 
four of the slices until crispy... dry and crumble.

Step 3:  In a small bowl, combine the cream cheese with other cheeses. Add the 
crumbled bacon. Place filling in piping bag w/ larger round or star tip.

Step 4:  Fill each jalapeno with the cheese mixture until the filling just reaches the top 
without over filling.

Step 5:  Wrap the peppers with the remaining bacon. Be sure to wrap bacon ends 
around the top of the jalapeno and secure with toothpicks. This will keep the cheese from 
running out.

Step 6:  Grill at medium temperature for about 40 minutes. Bacon should be cooked and 
slightly crispy and peppers should be wrinkly and soft.

Quaker - Create Your Day Charity Drive for Share Your Strength

  |     |   Print
 Quaker and Goodbite.com Team Up to Raise Money for Share Your Strength

As you probably know, I recently won a contest with Quaker Oats.  The prize was the best part... $10,000 was donated to Food For The Poor for the children of Haiti.  This was before the earthquake that devastated that region.  So, when Quaker and Good Bite asked if I would participate in another contest for charity - I jumped at the chance.  And this time those who benefit from this one live a little closer to home.... right here in the United States.

soshome.gifShare Your Strength is not just a charity organization.... it's a movement to stomp out childhood hunger in the United States.  We live in the land of dreams.  America offers more opportunity than any other country in the world.  Yet, we have kids who are hungry.  It's just not right.  It's even worse today in this bad economy.  Not only are families struggling more, but good charities are having a harder time raising money to help them.

Good Bite and Quaker came up with a fun way to raise funds for Share Your Strength.  Quaker created a fun website  QuakerOats.com/CreateYourDay where you can create your own oatmeal creation.  For every bowl of oatmeal created on this site, GoodBite.com & Quaker will donate $1.00 to “Share Our Strength”, a charity dedicated to ending childhood hunger, up to $25,000.  This goal is no small feat, but with your help we can do it.  $25,000 will go a long way to helping Share Our Strength continue their important work.

Several of the nation's top food bloggers were asked to participate in this very worthy cause. You can watch my video below and see David Lawrence introducing me to a new oatmeal creation to help "Create My Day".


I encourage all of you to visit QuakerOats.com/CreateYourDay and make your own oatmeal creation.  And please... share with your family and friends!!  It only takes a couple of minutes.... It's fun.... you'll be supporting a great cause.... and it won't cost you a cent!! 

So, please go "Create Your Day" and let's help Good Bite and Quaker reach their goal of raising $25,000 for Share Your Strength. 


var linkwithin_site_id = 72292; Related Posts with Thumbnails

Twitter Updates

---